
Unfortunately in the bare-metal world, development tools often come at a premium that is out of reach of hobbyist budgets. While I am grateful that microcontroller vendors frequently offer free development software, I often do not have a great experience working with these tools. I do however find them to be a great starting point when becoming acquainted with a particular microcontroller family.
After learning that Visual Studio Code (VS Code) offers extensions for debugging microcontroller projects, I decided to move my entire embedded development into VS Code and have not looked back since. This post will go through the steps that I took to be able to develop and debug firmware on VS Code. The files and code will be specific to the SiLabs EFM32PG12 microcontroller but the steps should apply to most microcontrollers.
Folder Structure
First, create an example project called cmake_embedded_test with the following folder structure:
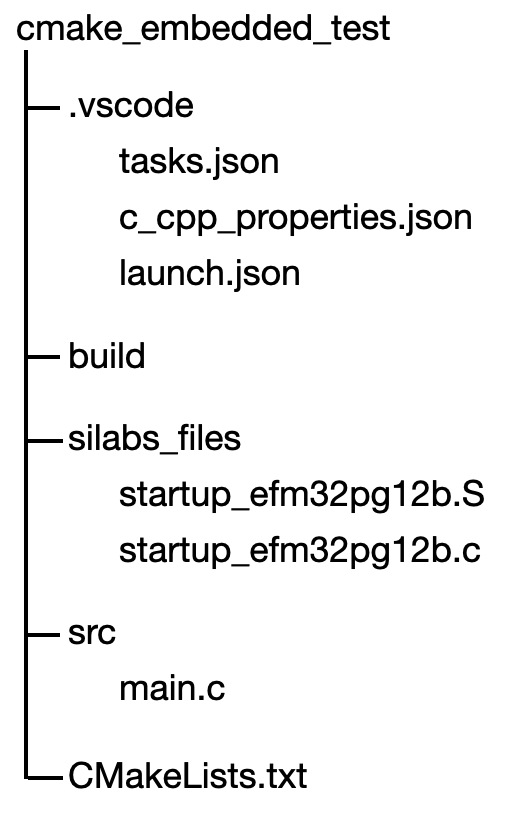
Don’t worry about the individual files just yet. We will get to those in more detail soon. For now, create this folder structure and create main.c. Don’t create or add the .json and startup files yet!
Generally when using an IDE, a folder structure with appropriate files are automatically generated for you. In this case, we will need to manually create the folder structure (although, it wouldn’t be terribly difficult to create a script to automate this for us!). The following subsections will explain the folders…
.vscode
This (hidden) folder contains appropriate configuration files for VS Code. These files will be important when writing, building and debugging your embedded code.
build
In the build process, the compiler and linker will generate a variety of intermediate files and executables. We will later tell the compiler to place those files in this location. Additionally, since we are using CMake to assist us with the build process, CMake-specific files will be stored here.
silabs_files
When writing c/c++ code, the program starts at the main( ) function. However, there is a lot that actually happens before the program reaches main( )! In bare-metal situations, there is a startup routine that must be done before reaching main. This is reflected in the startup_efm32pg12b.c and startup_efm32pg12b.S files. These are often available through the MCU manufacturer. If you already have Simplicity Studio, these files are found in the directory:
<Path to Simplicity Studio>/Eclipse/developer/sdks/gecko_sdk_suite/v3.0/platform/Device/SiliconLabs/EFM32PG12B/Source/GCCThe actual path depends on your particular device and how your manufacturer provides these files. Copy and paste the relevant startup files into the silabs_files folder.
There is one other piece of information needed to build the executable. The linker will need information about the memory layout of the MCU which is encoded in a linker script. If you have your own script, add a copy of that script into the silabs_files folder. MCU manufacturers often supply a script that you can use. In the EFM32PG12 MCU case, this script is found in the same directory as the startup files. Add a copy of the script into the silabs_files folder.
These files will be important when we edit the CMakeLists.txt file.
src
This is where your c source files will live.
Editor
Before continuing on, be sure to have the C/C++ extension for VS Code installed.
Now that we have created our folder structure, open the cmake_embedded_test folder in VS Code. Your environment should look something like this:
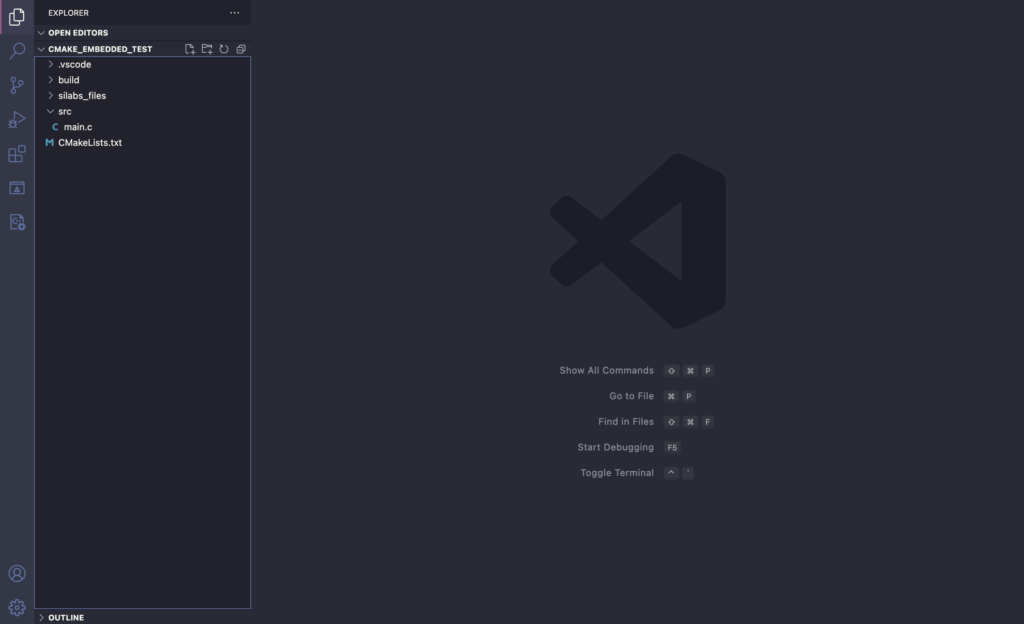
We will make a simple program that toggles one of the LEDs on the EFM32PG12B development board. Copy and paste the following code into main.c:
#include "em_device.h"
#include "bsp.h"
#include "em_chip.h"
#include "em_timer.h"
#include "em_cmu.h"

#include "arm_math.h"


void initializeTimer()
{
  //  Initialize TIMER0
  CMU_ClockEnable(cmuClock_TIMER0, true);
  TIMER_Init_TypeDef init = TIMER_INIT_DEFAULT;
  init.enable = false;
  init.prescale = timerPrescale512;

  //  Initialize the timer but don't enable it yet!
  TIMER_Init(TIMER0, &init);

  //  Configure the timer to trigger an interrupt when it reaches our max counter value
  NVIC_EnableIRQ(TIMER0_IRQn);
  TIMER_IntEnable(TIMER0, TIMER_IF_OF);

  TIMER_Enable(TIMER0, true);
}

void TIMER0_IRQHandler() {
  TIMER_IntClear(TIMER0, TIMER_IFC_OF);
  BSP_LedToggle(0);
}


int main(void)
{
  /* Chip errata */
  CHIP_Init();

  //  Setup system clock
  CMU_HFXOInit_TypeDef clockInit = CMU_HFXOINIT_STK_DEFAULT;
  CMU_HFXOInit(&clockInit);
  CMU_ClockSelectSet(cmuClock_HF, cmuSelect_HFXO);

  CMU_ClockEnable(cmuClock_HFPER, true);

  //  Initialize LEDs
  BSP_LedsInit();
  BSP_LedSet(0);

  initializeTimer();


  while(1);

}
You will probably have noticed that VS Code flags a lot of errors since it can’t find the header files for some of the functions in the code. This actually doesn’t really affect the build process but it is rather annoying to work with code littered with red squiggly lines. To fix this, we need to point VS Code to the directories where these header files are stored. This is done in the c_cpp_properties.json file.
Under .vscode, create a new file called c_cpp_properties.json. The file will have a format like the following:
{
    "configurations": [
        {
            "name": "EFM32_Dev",
            "includePath": [
                "${workspaceFolder}/**",
                "/Applications/Simplicity Studio.app/Contents/Eclipse/developer/sdks/gecko_sdk_suite/v3.0/platform/CMSIS/Include/",
                "/Applications/Simplicity Studio.app/Contents/Eclipse/developer/toolchains/gnu_arm/7.2_2017q4/arm-none-eabi/include/",
                "/Applications/Simplicity Studio.app/Contents/Eclipse/developer/toolchains/gnu_arm/7.2_2017q4/lib/gcc/arm-none-eabi/7.2.1/include",
                "/Applications/Simplicity Studio.app/Contents/Eclipse/developer/toolchains/gnu_arm/7.2_2017q4/lib/gcc/arm-none-eabi/7.2.1/include-fixed",
                "/Applications/Simplicity Studio.app/Contents/Eclipse/developer/sdks/gecko_sdk_suite/v3.0/platform/emlib/inc/",
                "/Applications/Simplicity Studio.app/Contents/Eclipse/developer/sdks/gecko_sdk_suite/v3.0/platform/Device/SiliconLabs/EFM32PG12B/Include",
                "/Applications/Simplicity Studio.app/Contents/Eclipse/developer/sdks/gecko_sdk_suite/v3.0/hardware/kit/common/bsp",
                "/Applications/Simplicity Studio.app/Contents/Eclipse/developer/sdks/gecko_sdk_suite/v3.0/hardware/kit/common/drivers",
                "/Applications/Simplicity Studio.app/Contents/Eclipse/developer/sdks/gecko_sdk_suite/v3.0/hardware/kit/SLSTK3402A_EFM32PG12/config"
            ],
            "defines": [
                "__FPU_PRESENT=1",
                "ARM_MATH_CM4=1",
                "EFM32PG12B500F1024GL125=1"
            ],
            "cStandard": "c99",
            "cppStandard": "gnu++98",
            "intelliSenseMode": "gcc-arm"
        }
    ],
    "version": 4
}
The most important things to add are the includePath directories and defines. We are using parts of the SiLabs EM Library (EMLIB) in our code so we need to add the paths where these headers are stored. The EMLIB source and header files are bundled with the Simplicity Studio application. For your specific setup, you will likely need to add paths to your choice of libraries.
Building Your Code
CMake
Now that we have our editor setup, the next step is to build our code. We are going to use CMake to generate the makefiles for us. Install CMake if you do not already have it. On Mac, we recommend using Homebrew to install CMake.
There are some extra configurations that need to be made when using CMake for bare-metal systems. Thankfully, the lovely folks at JetBrains have provided a template CMakeLists.txt file that we can work with.
The template is written for bare-metal development on STM MCUs so we will have to modify some parts to work with our SiLabs MCU. The resulting CMakeLists.txt file can be found in the following gist. Let’s take a closer look at the file:
set(CMAKE_C_COMPILER arm-none-eabi-gcc)
set(CMAKE_CXX_COMPILER arm-none-eabi-g++)
set(CMAKE_ASM_COMPILER arm-none-eabi-gcc)
set(CMAKE_AR arm-none-eabi-ar)
set(CMAKE_OBJCOPY arm-none-eabi-objcopy)
set(CMAKE_OBJDUMP arm-none-eabi-objdump)
set(SIZE arm-none-eabi-size)
set(CMAKE_TRY_COMPILE_TARGET_TYPE STATIC_LIBRARY)
Code for our MCU is compiled using the ARM GCC toolchain (arm-none-eabi-gcc/g++) which is bundled with Simplicity Studio. However, you are free to use the latest version of the toolchain instead! Note that you should add the toolchain directory to $PATH.
The following section sets the project name (cmake_embedded_test), the C standard (gnu-c11) and the paths to the SiLabs Gecko SDK (where EMLIB and board-specific sources are stored). These paths are used for specifying header and source files specific to this code and is optional.
project(cmake_embedded_test C ASM)
set(CMAKE_C_STANDARD 11)

set(MCPU cortex-m4)
set(GECKO_SDK_PATH /Applications/Simplicity\ Studio.app/Contents/Eclipse/developer/sdks/gecko_sdk_suite/v3.0)
set(TOOLCHAIN_PATH /Applications/Simplicity\ Studio.app/Contents/Eclipse/developer/toolchains/gnu_arm/7.2_2017q4)
The EFM32PG12B uses the ARM Cortex M4 processor with a floating point unit (FPU). Since we are going to use the FPU, we need to make GCC aware of this. If you are not using the FPU (or your processor does not have one), simply comment out this section:
add_compile_definitions(ARM_MATH_CM4)
add_compile_options(-mfloat-abi=hard -mfpu=fpv4-sp-d16)
add_link_options(-mfloat-abi=hard -mfpu=fpv4-sp-d16)
If not using the FPU, you will need to uncomment this line:
add_compile_options(-mfloat-abi=soft)The next section specifies the location of the header and source files. Under include_directories, add the paths to your headers. Sources are specified under file. It is recommended that the exact source files needed are added to file rather than using the wildcard approach (*.c). Using the wildcard can result in compilation errors when the compiler attempts to build source files in the folder that are not relevant to your project.
Using the FPU requires us to specify a couple of macros (see Silly Audio Processing 2): __FPU_PRESENT and ARM_MATH_CM4. If you are not using the FPU, you can remove these macros.
include_directories(
        ${GECKO_SDK_PATH}/hardware/kit/common/bsp
        ${GECKO_SDK_PATH}/hardware/kit/common/drivers
        ${GECKO_SDK_PATH}/platform/CMSIS/Include
        ${GECKO_SDK_PATH}/platform/Device/SiliconLabs/EFM32PG12B/Include
        ${GECKO_SDK_PATH}/platform/emlib/inc
        ${TOOLCHAIN_PATH}/arm-none-eabi/include
        ${TOOLCHAIN_PATH}/arm-none-eabi/lib/gcc/arm-none-eabi/7.2.1/include
        ${TOOLCHAIN_PATH}/arm-none-eabi/lib/gcc/arm-none-eabi/7.2.1/include-fixed
        )

add_definitions(-D__FPU_PRESENT=1 -DARM_MATH_CM4=1 -DEFM32PG12B500F1024GL125=1)

file(GLOB_RECURSE SOURCES
        "src/*.*"
        "silabs_files/*.*"
        "${GECKO_SDK_PATH}/platform/emlib/src/*.c"
        "${GECKO_SDK_PATH}/hardware/kit/common/bsp/bsp_stk_leds.c"
        )
Next, we move to the linker configurations. We need to supply CMake with the previously mentioned linker script. The next two lines are related to the FPU.
set(ARM_MATH_LIBS arm_cortexM4lf_math.a) simply aliases the library name (from arm_cortexM4lf_math.a to ARM_MATH_LIBS) while link_directories( ) sets the path to the aforementioned library.
set(LINKER_SCRIPT ${CMAKE_SOURCE_DIR}/silabs_files/EFM32PG12.ld)
set(ARM_MATH_LIBS arm_cortexM4lf_math.a)
link_directories(${GECKO_SDK_PATH}/platform/CMSIS/Lib/GCC)
Finally, this section specifies what the executable is called (cmake_embedded_test.axf) and adds the libraries that need to linked to the executable. Note that in this example, we are using the .axf executable format. Some MCUs from other manufacturers might use .elf.
add_executable(${PROJECT_NAME}.axf ${SOURCES} ${LINKER_SCRIPT})
target_link_libraries(${PROJECT_NAME}.axf ${ARM_MATH_LIBS})
We have now fully configured CMake to generate the necessary makefiles. To generate the makefiles and build the code, in a command line enter the build directory and execute the command:
$cmake ..This will generate the makefiles. To build the code, we can enter:
$cmake --build .
OR
$make all
Since we want to integrate the build process into VS Code, we can create VS Code tasks that run these commands for us.
Creating Build Tasks
Under the .vscode folder, create another file called tasks.json. We are going to create three different tasks that cleans the project, builds in debug mode and builds in release mode. The JSON file will look like the following:
{
    "version": "2.0.0",
    "tasks": [
      { "label": "Clean Project",
        "type": "shell",
        "command": "cmake --build . --target clean",
        "options" : {
          "cwd" : "${workspaceFolder}/build"
        }
      },

      { "label": "Build DEBUG",
        "type": "shell",
        "command": "cmake .. -DCMAKE_BUILD_TYPE= ;cmake --build .",
        "options" : {
          "cwd" : "${workspaceFolder}/build"
        }
      },

      { "label": "Build RELEASE",
        "type": "shell",
        "command": "cmake .. -DCMAKE_BUILD_TYPE=Release; cmake --build .",
        "options" : {
          "cwd" : "${workspaceFolder}/build"
        }
      }
    ]
}
These tasks execute the same commands used to build the source code in the previous section.
Finally, let’s run the build process. Click Terminal>Run Task>Build Debug and you should see the build progress in the bottom output window. The .axf executable can be found in the build folder. This is important because we need this file for our final step: Debugging.
Debugging
VS Code has a great extension for debugging ARM Cortex targets: Cortex-Debug and we will be using this to upload our binaries onto the microcontroller and debug.
In addition to Cortex-Debug, you will need to install software that will interface the GDB server with your microcontroller. This can be J-Link, OpenOCD, ST-Link etc. In this case, we are using J-Link but you can choose whatever package that you would like to use.
Configuration
After installing Cortex-Debug and J-Link, there is some configuration that needs to be done. We need to specify the paths to J-Link and the toolchain (arm-none-eabi-gcc, etc). This can be done under Settings>Extensions>Cortex-Debug. Under Arm Toolchain Path, click Edit in settings.json. This will open up a JSON file. Add or edit the following lines into the JSON file:
"cortex-debug.armToolchainPath": "/Applications/Simplicity Studio.app/Contents/Eclipse/developer/toolchains/gnu_arm/7.2_2017q4/bin/",
"cortex-debug.JLinkGDBServerPath": "/Applications/SEGGER/JLink/JLinkGDBServer"
Your paths may differ. Note that if you are using ST-Link instead of J-Link, the key name will be cortex-debug.stlinkPath.
launch.json
We have one more json file that we need to add: launch.json. This file will tell Cortex-Debug our exact setup parameters needed in order to communicate to the microcontroller and debug:
{
"version": "0.2.0",
"configurations": [
{
"type": "cortex-debug",
"request": "launch",
"name": "Debug (JLink)",
"servertype": "jlink",
"interface": "swd",
"cwd": "${workspaceRoot}",
"runToMain": true,
"executable": "${workspaceRoot}/build/cmake_embedded_tests.axf",
"device": "EFM32PG12BxxxF1024",
"svdFile":""
}
]
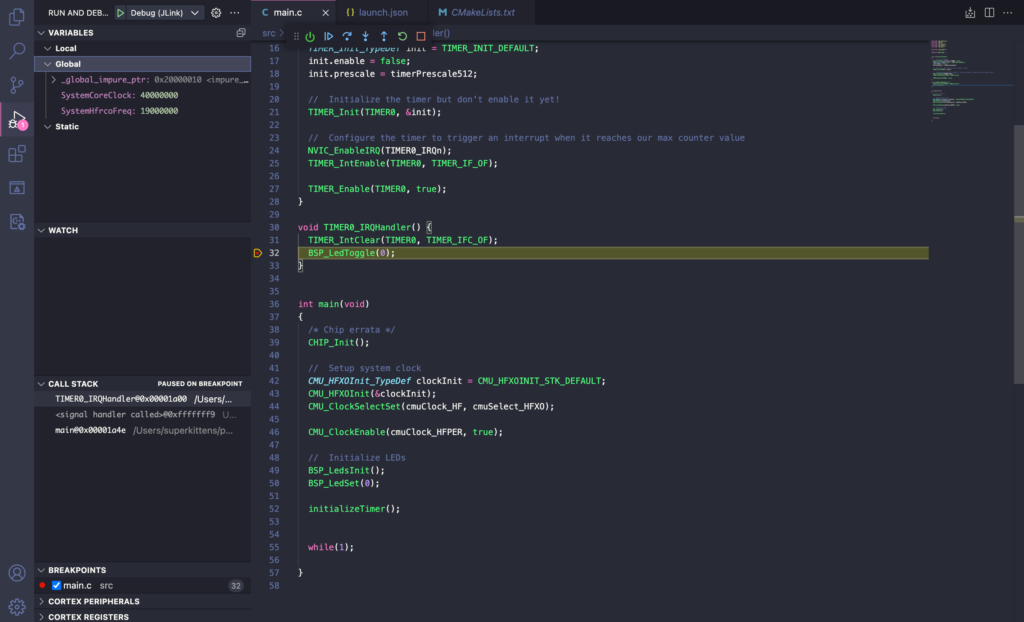
}Again, if you are using ST-Link, servertype shoudl be stlink. Your particular microcontroller should be added under device. runToMain will halt at the start of main() when debugging starts. interface may or may not be different depending on your setup. If you are using JTAG, this should be added instead. Remember to add the proper path to your .axf executable file under executable. Save this JSON file and then click Run>Start Debugging. VS Code will flash your microcontroller and you will finally be able to debug your code!

SVD Files (Optional)
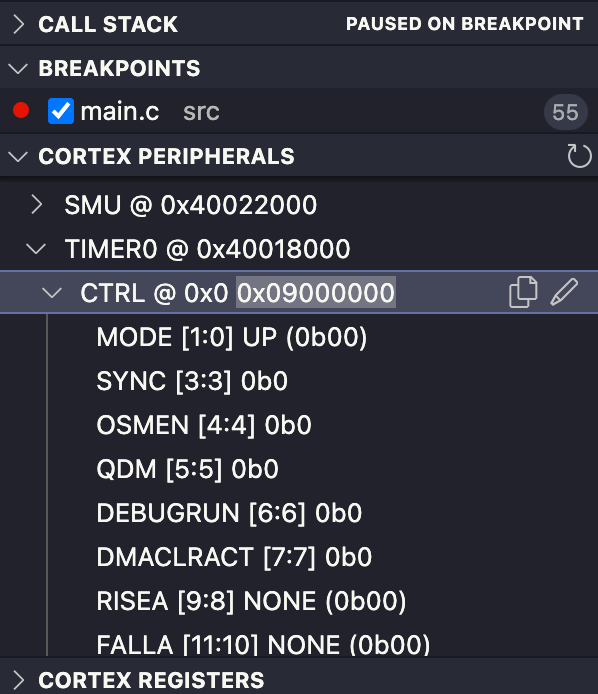
When debugging firmware, you may sometimes examine the contents of the peripheral registers. You are able to do this in VS Code but you will need to supply a SVD file first. The SVD file may be available from your manufacturer. If not, it may be available here. Search for your microcontroller and download the Device Family Pack. Before debugging, ensure that you have specified the path to the SVD file in launch.json.
The peripheral registers can be found in Cortex Peripherals under the debug view:
Final Remarks
While there are a number of steps needed to setup VS Code for firmware development, if you find that your current development environment leaves a lot to be desired then I recommend giving this setup a try!