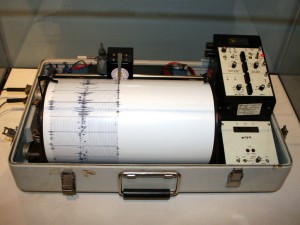
Welcome to part one of the Seismic Sundays series! For the next 3 to 6 months, I’ll be attempting to make a seismology station that sends data to a web server for anyone to see. Today’s post won’t have anything technical on it. I will just be talking about what I plan on doing.
Why am I doing this?
Many of you might know that Sparkfun has a new product post every Friday. One particular post had this geophone for sale. Around the same time, I was corresponding with a glaciologist and after seeing the geophone, I wondered if seismometers were used in glaciers. Cue email thread:
…if you put a seismometer in a glacier would you
pick up anything interesting? Maybe an array of seismometers would be
more useful…
Her answer:
Indeed, you can do all sorts of things with seismometers on glaciers, especially calving ones! Also hydrophones and a whole schwack of other cool things. They use them to identify and monitor calving events, since it’s so dangerous to be on the water or nearby during the events.
I thought to myself, how neat would it be to build a seismometer and put it on a glacier and have it collect data? Unfortunately, I didn’t get around to building a station that year and my recent move put me in a place where accessing glaciers is a lot tougher. So, instead of putting the stations on glaciers (which might still happen. Who knows?) I’ve decided to place one or two around the Calgary area and see what I get. I doubt I’ll get anything cool but this is really about learning from the build process than anything else.
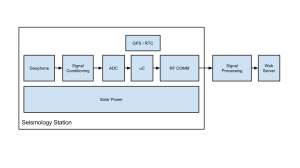
Above is the high level block diagram so far. Apologies for the small image. Clicking on it should show the large version in another tab. The station consists of seven main components:
- Geophone: This is the SM-24 geophone made by SENSOR
- Signal Conditioning: This is the circuitry that filters out and amplifies the geophone signal
- ADC: I’m thinking of using a separate high speed ADC with at least 12 bits of resolution instead of the built in ADC in the microcontroller
- Microcontroller: I plan to use a low power microcontroller to handle the bits of data going in and out. Nothing too fancy here
- Communications: I’m actually at a loss at what I want to do here. I *could* use XBees and appropriate long distance antennas or I could use something else. I’ll cross that bridge when I get here
- GPS or RTC: I want to time stamp each packet of data that I send out to the signal processing portion. A GPS would be nice as it could also include location data but I want to keep the power consumption low so an RTC might be the better choice here
- Power: I would like the station to be solar powered but also have a battery backup. I know there will be lots of learn here
I plan for the data to be transmitted from the station to a central computer which handles the signal processing for each station. So far, I only plan on having the computer (most likely a Raspberry Pi) perform an FFT on the raw signal. The computer will also ship off the raw and FFT data to a web server – although, the computer itself could be the server. We shall see.
To be completely honest, the web portion is the part that scares me the most since web design is very well outside my comfort zone, but hey, you can’t learn unless you dive in right?
So there you have it, the initial build plan so far. We will see how things go.


